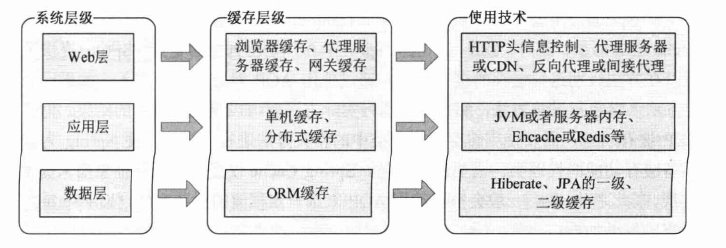
Spring Cache 策略 不同层级对应的缓存要求和缓存策略,
自定义缓存实现 场景: 用户查询是一个十分常见的动作,为了提高页面相应速度,将用户的userid作为key,返回的用户信息作为value,而当以相同的userid查询用户时,程序直接从缓存中获取结果并返回,否则更新缓存.
首先定义一个User实体类
1
2
3
4
5
6
7
public class User implements Serializable private String userid; private String userName; private int age; }
Java对象的缓存和序列化息息相关,一般情况下,需要被缓存的实体类需要实现Serializable ,只有实现了Serializable接口的类,JVM才会对其对象进行序列化. 对于redis,EhCache 等缓存套件来说,被缓存的对象应该是可以序列化的,否则在网络传输,硬盘传输时都会抛出序列化异常
接着定义一个缓存管理器,管理器负责实现缓存逻辑,支持对象的增加,修改和删除,并支持值对象的泛型.
1
2
3
4
5
6
7
8
9
10
11
12
13
14
15
16
17
18
19
20
21
22
23
24
public class cacheManager <T > private Map<String,T> cache =new ConcurrentHashMap<String, T>(); public T getValue (Object key) { return cache.get(key); } public void addOrUpdateCache (String key,T value) { cache.put(key,cache); } public void evictCache (String key) { if (cache.containsKey(key)) { cache.remove(key); } } public void evictCache () { cache.clear(); } }
有了实体类和一个缓存管理器,还需要一个提供用户查询的服务类,此服务类使用缓存管理器来支持用户查询.
1
2
3
4
5
6
7
8
9
10
11
12
13
14
15
16
17
18
19
20
21
22
23
24
25
26
27
28
29
30
31
32
33
34
35
public class Userservice private CacheManager<User> cacheManager; public UserService () { cacheManager =new CacheManager<User>(); } public User getUserByID (String userid) { User result = cacheManager.getValue(userid); if (result!=null ) { System.out.plintln("get from cache" +userid); return result; } result = getFromDB(userId); if (result!=null ) { cacheManager.addOrUpdateCache(userid,result); } return result; } public void reload () { cacheManager.evictCache(); } private User getFromDB (String userid) { System.out.println("querying db" +userid); return new User(userid); } }
上面就是一种自定义缓存的方法,但是缓存代码和业务代码高度耦合,如果要新增功能,代码将进一步复杂化.
下面使用spring cache来实现上面的例子. 因为Spring已经提供了默认的缓存管理器,所以不用自己实现缓存模拟器
1
2
3
4
5
6
7
8
9
10
11
@Service public class UserService () @Cacheable (cacheNames="users" ) Public User getUserById (String userId) { System.out.println("query" +userid); return getFromDB(userId); } }
@Cacheable(cacheNames="users")注解标注的方法被调用的时候,会先从users缓存中查询匹配的缓存对象,如果存在就直接返回,不存在就查询数据库,并将返回值放入缓存中,对应缓存的key为userId的值,value就是userId所对应的User对象,缓存名称要在spring配置文件中定义.
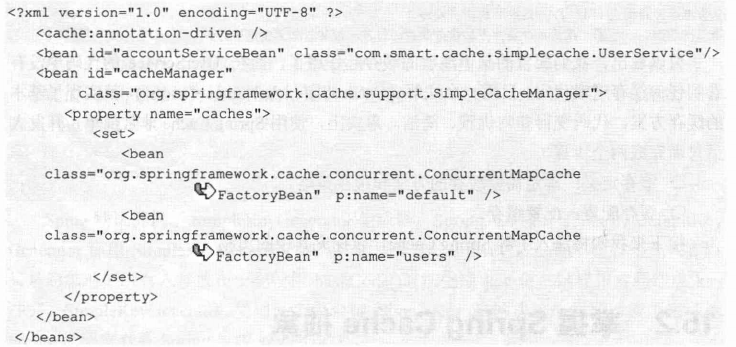
在spring配置文件中配置支持基于注解的缓存
Spring 通过<cache: annotation-driven/> 即可启动基于注解的缓存驱动,配置项默认使用了定义为cacheManager的缓存管理器,SimpleCacheManager是这个缓存管理器的默认实现,相当于前面自己实现的缓存管理器,可以看到,除了默认的default缓存外,还有一个名为users的缓存.
上面就是使用自定义cache和使用spring cache的过程.
详细介绍Spring Cache 缓存注解 首先,只有使用public定义的方法才可以被缓存,注解定义了哪些方法的返回值会被缓存或者从缓存中移除.
@Cacheable @Cacheable是最重要的注解,它制定了注解方法的返回值是可以被缓存的,缓存名必须提供,一般使用cacheNames或者Value属性来定义名称
1 @Cacheable (cacheNames="users" ) 或@Cacheable (value="users" )
1
2
3
4
5
@Cacheable (cacheNames="users" )public User getUser (String id) return user.get(id); }
上面的例子以id为键值(key)将用户(value)缓存至users缓存段中,此外还可以自定义键
Spring cache中的值是返回值,键有以下情况
如果方法没有入参,则使用SimpleKey.Empty 作为key
如果只有一个入参,则使用该入参作为key
如果有多个入参,则返回包含所有入参的一个SimpleKey
也可以用SPEL自定义键值
@CachePut 和@Cacheable注解效果几乎一样,当需要保证方法被调用,又希望结果被缓存, 可以使用@CachePut
@CacheEvict @CacheEvict注解是@Cacheable注解的反向操作,负责从给定的缓存中移除一个值.
缓存管理器 CacheManager是SPI(服务程序提供接口)提供了访问缓存名称和缓存对象的方法,同时也提供了管理缓存,操作缓存,和移除缓存的方法
Spring + EhCache 1 .pom.xml
1 2 3 4 5 6 <dependency > <groupId > net.sf.ehcache</groupId > <artifactId > ehcache</artifactId > <version > 2.8.2</version > </dependency >
2 .添加ehcache配置文件ehcache-setting.xml
1
2
3
4
5
6
7
8
9
10
11
12
13
14
15
16
17
18
19
20
21
22
23
<?xml version="1.0" encoding="UTF-8"?> <ehcache > <diskStore path ="java.io.tmpdir" /> <defaultCache maxElementsInMemory ="10000" eternal ="false" overflowToDisk ="true" timeToIdleSeconds ="10" timeToLiveSeconds ="20" diskPersistent ="false" diskExpiryThreadIntervalSeconds ="120" /> <cache name ="cacheTest" maxElementsInMemory ="1000" eternal ="false" overflowToDisk ="true" timeToIdleSeconds ="10" timeToLiveSeconds ="20" /> </ehcache >
3 .spring 配置文件application.xml
1
2
3
4
5
6
7
8
9
10
11
12
13
14
15
16
17
18
19
20
21
22
23
24
25
26
27
28
<?xml version="1.0" encoding="UTF-8"?> <beans xmlns ="http://www.springframework.org/schema/beans" xmlns:xsi ="http://www.w3.org/2001/XMLSchema-instance" xmlns:cache ="http://www.springframework.org/schema/cache" xmlns:context ="http://www.springframework.org/schema/context" xmlns:aop ="http://www.springframework.org/schema/aop" xsi:schemaLocation =" http://www.springframework.org/schema/beans http://www.springframework.org/schema/beans/spring-beans-3.0.xsd http://www.springframework.org/schema/aop http://www.springframework.org/schema/aop/spring-aop-3.0.xsd http://www.springframework.org/schema/context http://www.springframework.org/schema/context/spring-context-3.0.xsd http://www.springframework.org/schema/cache http://www.springframework.org/schema/cache/spring-cache-3.1.xsd" > <context:component-scan base-package ="com.sysu.service" /> <cache:annotation-driven cache-manager ="cacheManager" /> <bean id ="cacheManager" class ="org.springframework.cache.ehcache.EhCacheCacheManager" > <property name ="cacheManager" ref ="ehcache" > </property > </bean > <bean id ="ehcache" class ="org.springframework.cache.ehcache.EhCacheManagerFactoryBean" > <property name ="configLocation" value ="classpath:ehcache-setting.xml" > </property > </bean > </beans >
EhCacheTestService接口
1
2
3
4
package com.sysu.service;public interface EhCacheTestService public String getUserid (String param) }
5 .EhCacheTestService接口的实现
1
2
3
4
5
6
7
8
9
10
11
12
package com.sysu.service.impl;import org.springframework.cache.annotation.Cacheable;import org.springframework.stereotype.Service;import com.sysu.service.EhCacheTestService;@Service public class EhCacheTestServiceImpl implements EhCacheTestService @Cacheable (value="cacheTest" ,key="#param" ) public String getTimestamp (String param) Long timestamp = System.currentTimeMillis(); return timestamp.toString(); } }