Spring的配置
要使spring容器成功启动,需要具备下面三个条件,spring框架的类包都已经放到应用程序的类路径下,应用程序为spring提供了完整的Bean配置信息,Bean的类都已经放到应用程序的类路径下.
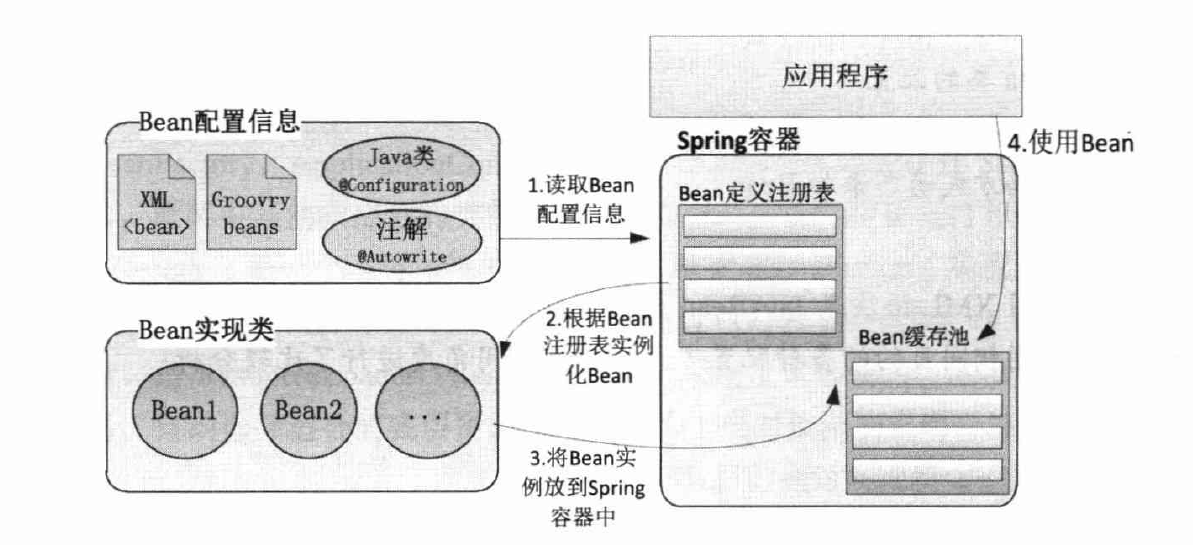
spring容器和Bean的使用流程图如下:
基于XML的配置
1 | <?xml version="1.0" encoding="UTF-8"?> |
XML Schema 描述 XML 文档的结构。首先在上面的配置文件中
xmlns="http://www.springframework.org/schema/beans"规定了默认的命名空间,用于spring bean 的定义
xmlns:xsi="http://www.w3.org/2001/XMLSchema-instance" 是标准命名空间,用于为每个文档中的命名空间指定相应的Schema 样式文件,是W3C 定义的标准命名空间
xmlns:tx="http://www.springframework.org/schema/tx"这种都属于自定义的命名空间,比如tx就表示spring配置事务的命名空间.
命名空间的定义分为两个步骤.
- 第一步指定命名空间的名称,
- 第二步指定命名空间的schema文档格式文件的位置,用空格或者回车换行就进行分割.
在第一步中,需要指定命名空间的缩略名和全名比如
xmlns:tx="http://www.springframework.org/schema/tx" tx为命名空间的别名,一般使用简记的形式,而http://www.springframework.org/schema/tx为空间的全限定名,习惯上用文档发布机构的官方网站和相关网站目录作为全限定名
如果命名空间的别名为空,则表示该命名空间为文档默认命名空间,文档中无命名空间前缀的都属于默认命名空间.如<beans>
第二步中,为每个命名空间指定了对应的schema文档格式的定义文件,定义的语法如下:
<命名空间1> <1的schema文件> 命名空间2> <2的schema文件>
命名空间使用全限定名,每个组织机构在发布schema文件后,都会为该schema文件提供一个引用的URL地址,一般使用这个URL地址指定命名空间对应的schema文件.
装配一个Bean
在spring容器的配置文件中定义一个简要bean的配置片段
<bean id="Foo" class="com.smart.Foo">
一般情况,springIoC容器中的一个Bean对应配置文件中的一个<bean>,通过容器的getBean()即可获取相应的bean.
整合多个配置文件
spring允许使用import将多个配置文件引入到一个文件中,进行配置文件的集成.(p命名空间是一种简化的配置方式,)
1 | <import resource="classpath:com/sysu/beans1.xml"/> |
p:name ="john" 就是property name的值为john .p:属性-ref=”其他bean的id” 是引用bean.
基于注解的配置
使用注解定义Bean
前面说,spring容器成功启动的三个要件是bean定义信息,bean实现类,及spring本身,如果用XML方式,那么定义信息和实现类就是分离的,基于注解则是一个更好的方法.
例如在Dao上使用@Component注解,就可以被spring容器识别,并转换为容器管理的Bean.
- @Repository 用于对DAO实现类进行标注
- @Service 用于对Service实现类进行标注
- @Controller 用于对Controller实现类进行标注
扫描注解定义的Bean
spring 提供了一个context命名空间,提供了通过扫描类包以应用注解定义Bean的方式,
1 | <beans |
声明context命名空间后,就可以通过context命名空间的Component-scan 的base-package属性指定一个需要扫描的基类包,spring会扫描这个基类包的所有类,并从类的注解信息中获取Bean的定义信息.
自动装配Bean
spring使用@Autowired注解实现Bean的依赖注入,@Autowired默认按类型匹配的方式在容器中查找匹配的Bean,当且仅有一个匹配的Bean的时候,Spring将其注入@Autowired标注的变量中.
如果希望spring即使找不到对应的Bean也不要报出异常,可以用@Autowired(required=false)进行标注
如果在容器中有一个以上匹配的Bean时,可以通过@Qualifier注解限定Bean的名称例如
1 |
|
也可以在类方法上标注@Autowired,也更加推荐这样写.
对集合类进行标注
spring如果发现变量是一个Lis和一个Map集合类,它会将容器中匹配集合元素类型的所有Bean都注入进来,
延迟依赖注入
在spring容器启动的时候,对于在Bean上标注@Lazy及@Autowired注解的属性,不会立即注入属性值,而会延迟到调用此属性的时候才会注入属性值.
Spring 的配置方法
Spring的配置方法有三种,分别是基于XML的配置,基于注解的配置和基于Java Config 的配置。
基于XML注入有getter/setter注入和构造器注入。
Author: corn1ng
Link: https://corn1ng.github.io/2017/12/26/Spring的配置/
License: 知识共享署名-非商业性使用 4.0 国际许可协议